Accelerate Color Conversion Functions using NASM


Introduction
As we developed certain features of our software, we came up with the idea that it was time to think about acceleration and optimization. What to do when it seems that everything which could be accelerated is already accelerated, and everything that needs to be optimized is already optimized?
By developing color-conversion functions, we achieved good performance due to the simplicity of conversions. However, we wondered if there were any external methods that could be used to accelerate our functions. In search of ways to speed up the color-conversion processes, we decided to try using the Assembler. Even though Assembler is a highly unpopular and complex programming language, it remains indispensable for a diverse range of problems. There are several assembler translators available for use with Intel processors, such as FASM, MASM, YASM, and NASM (the list is incomplete). In this article, we use the NASM translator because it is multi-platform (available for Linux, Windows, and macOS) and due to its powerful macros system. It also has a relatively large user base.
Our article will show how to download NASM and connect the Assembler for Linux (CLion) and Windows (Visual Studio). We'll show you how to use Assembler in your projects and tell you what were the results we encountered so that you can comprehend whether you need to include Assembler in your projects or not.
A summary of NASM:
NASM (Netwide Assembler) is a free and open-source assembler that supports several platforms and object file formats. Its syntax is more explicit and consistent than the MASM (Microsoft Macro Assembler). NASM is regularly updated with new instruction sets. NASM is currently the best multi-platform Assembler and is widely used by assembler developers.
Also, NASM contains a powerful macro processor that supports conditional assembling, multi-level file inclusion, two forms of macro definitions (single-line and multi-line), and a "context stack" mechanism that extends macro definitions. All preprocessor directives start with a % sign.
Install NASM
We would like to show you how to install and use NASM on your machine. We are going to consider Windows and Linux installation.
On Linux system, to install nasm package, use:
- apt-get install nasm (Ubuntu)
- yum install nasm (CentOS)
If you want to build NASM from the source, go to https://www.nasm.us and click DOWNLOAD.
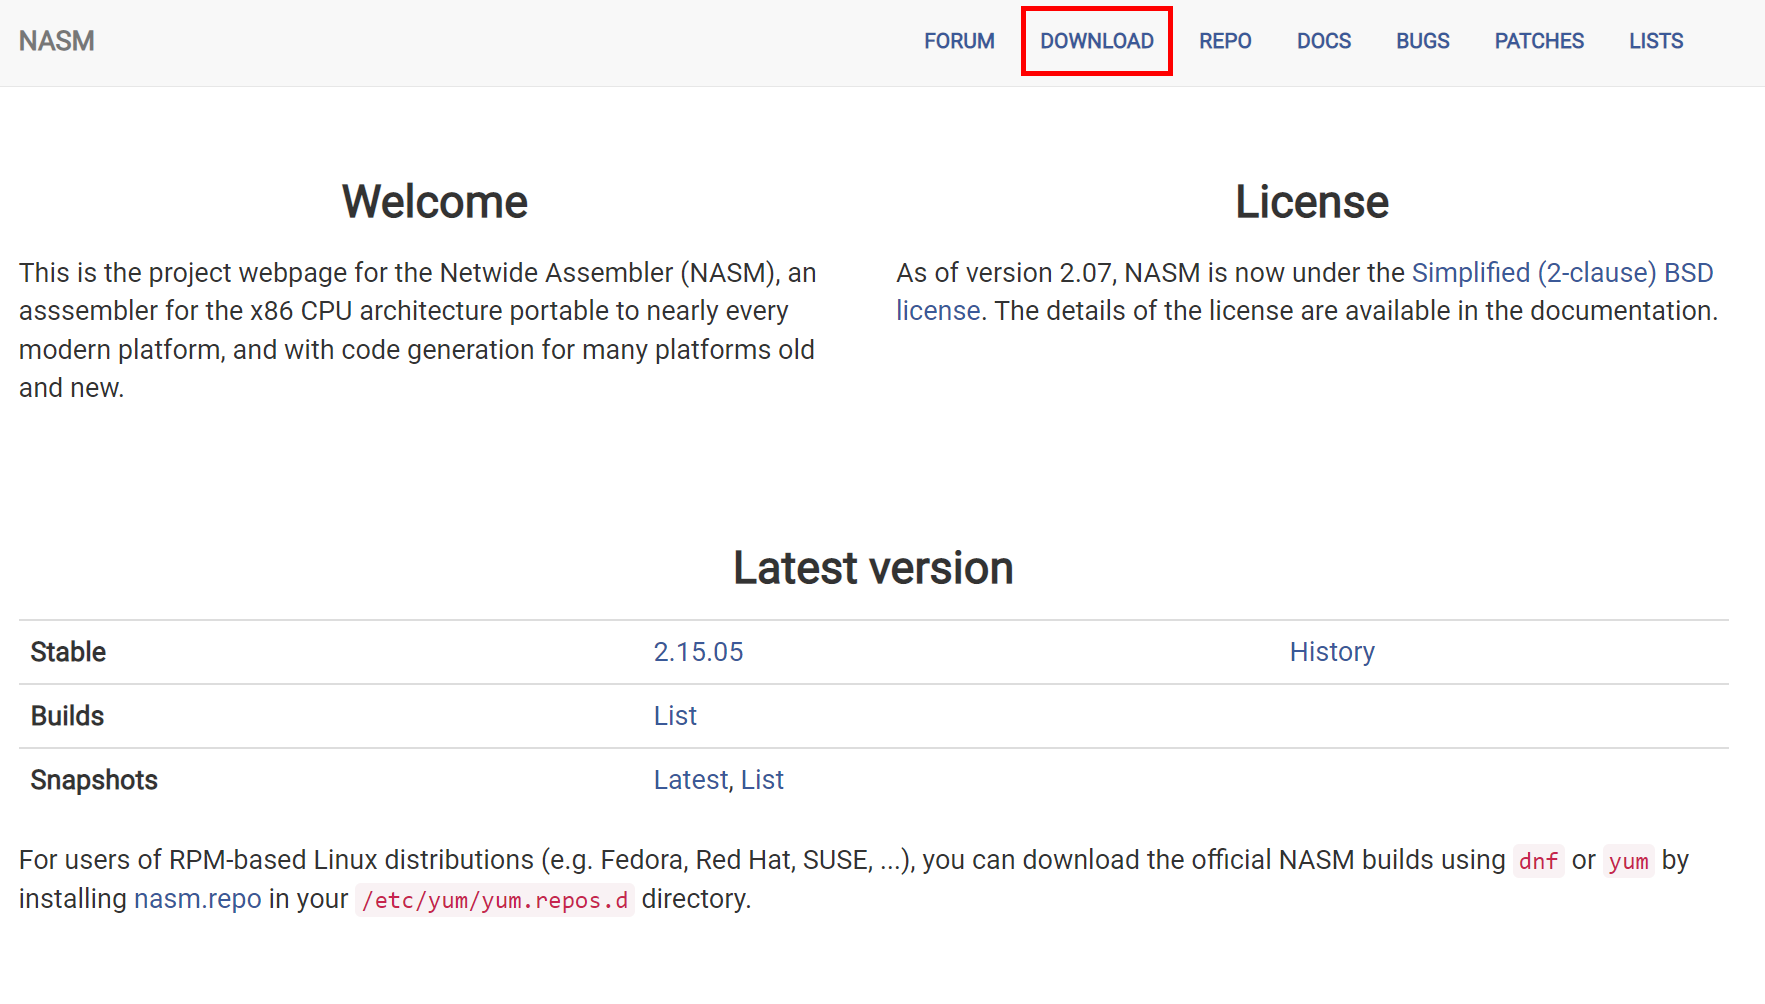
Choose the version. We have used the latest NASM version - 2.15.05
There are directories with installers for each platform and archives with the source code.
You can choose different ways to install NASM. The basic and more useful is downloading the archive, such as nasm-2.15.05.tar.gz, extracting and typing from the unpacked directory /configurе to execute the shell script. NASM is configured, then builds NASM with the make command and is installed with the make install. Default installation is to /usr/local/bin. Note that the file INSTALL has more installation information. It might help to use the instructions required for your system.
Depending on your system, you also need to download the archive on Windows systems, either win32 or win64. Next, in order to get NASM in the PATH variable, you need to unzip the archive to any folder you like and run the .exe file.
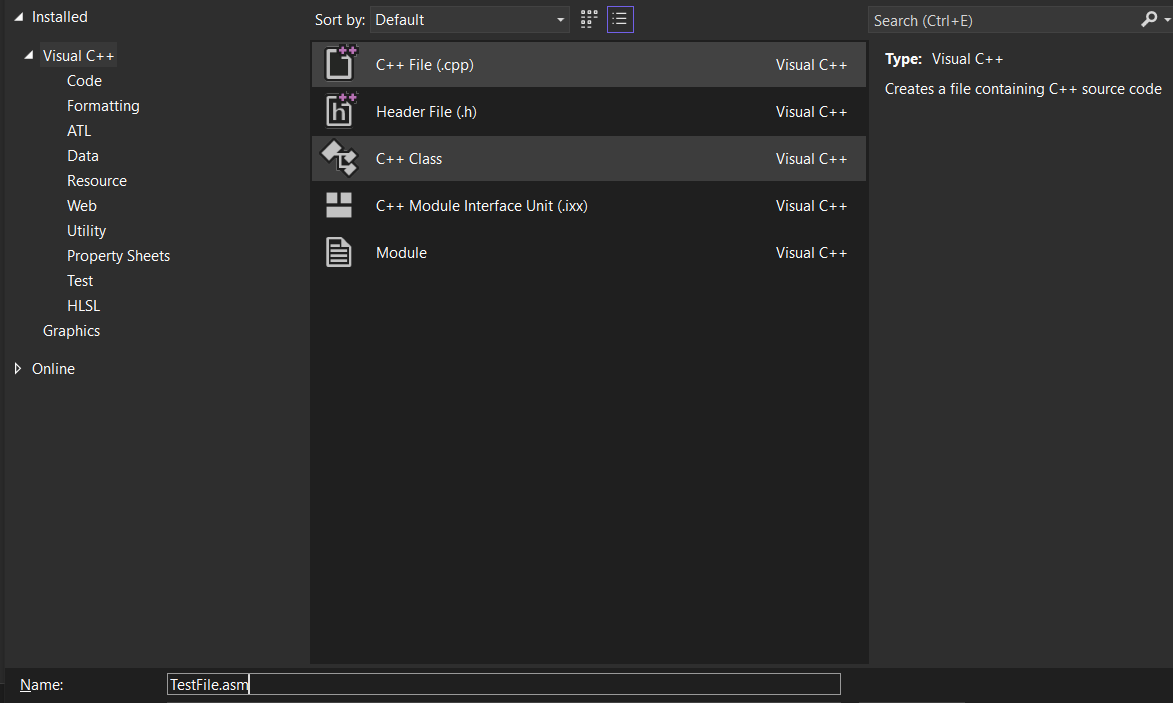
Next, let's check if Visual Studio picks up the NASM translator. To do this, you need to create an empty C++ project.

Now create an .asm file. To do this, you have to choose the C++ File (.cpp) option and rename the file type to .asm
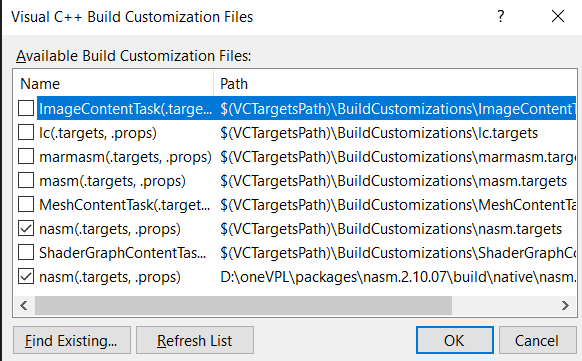
After creating the file, right-click on the solution, look for Build Dependencies, and click on Build Customization, as shown in the picture below.
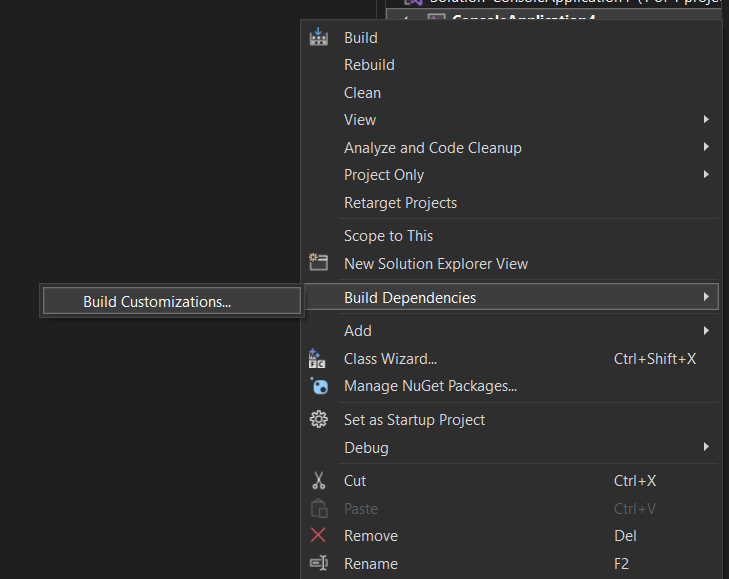
The final step is to make sure that Visual Studio recognizes the assembler file and selects the right translator; otherwise, you must manually check the boxes for nasm.
After these preparations, your NASM should be installed in your development environment and is ready for use.
How to use NASM in a project?
First, we should point out that function arguments are passed in registers. There are several variants for each architecture. On Windows, we can define **fastcall, keywords throw the DEF_FASTCALL, on Linux, define attribute((regparm(3))). **fastcall keyword indicates the first four arguments are passed in registers (RCX, RDX, R8, R9), and other arguments are passed on the stack. In the case with attribute regparm(number), it allows passing number arguments in registers, and the rest of arguments are passed on the stack.
#if PLATFORM_WINDOWS
#define DEF_FASTCALL __fastcall
#else
#define DEF_FASTCALL __attribute__((__regparm__(3)))
#endif
Then we need to define color-conversion functions. extern "C" shows that the function uses “C” language calling. There are two pairs of functions. The first pair is a conversion from YUV420P to P010 realized in C (PlainC) language and AVX2 (asm). And another one - from YUV420P to UYVY422.
extern "C" bool  DEF_FASTCALL convertYUV420PToP010_PlainC(
    uint8_t const* src_y, int32_t const src_stride_y,
    uint8_t const* src_u, int32_t const src_stride_u,
    uint8_t const* src_v, int32_t const src_stride_v,
    uint8_t * dst_y, int32_t const dst_stride_y,
    uint8_t * dst_uv, int32_t const dst_stride_uv,
    int32_t const width, int32_t const height);
extern "C" bool  DEF_FASTCALL convertYUV420PToP010_AVX2(
    uint8_t const* src_y, int32_t const src_stride_y,
    uint8_t const* src_u, int32_t const src_stride_u,
    uint8_t const* src_v, int32_t const src_stride_v,
    uint8_t * dst_y, int32_t const dst_stride_y,
    uint8_t * dst_uv, int32_t const dst_stride_uv,
    int32_t const width, int32_t const height);
extern "C" bool DEF_FASTCALL convertYUV420PToUYVY422_PlainC(
    uint8_t const* src_y, int32_t const src_stride_y,
    uint8_t const* src_u, int32_t const src_stride_u,
    uint8_t const* src_v, int32_t const src_stride_v,
    uint8_t * dst, int32_t const dst_stride,
    int32_t const width, int32_t const height);
extern "C" bool DEF_FASTCALL convertYUV420PToUYVY422_AVX2(
    uint8_t const* src_y, int32_t const src_stride_y,
    uint8_t const* src_u, int32_t const src_stride_u,
    uint8_t const* src_v, int32_t const src_stride_v,
    uint8_t * dst, int32_t const dst_stride,
    int32_t const width, int32_t const height);
For note PlainC functions are implemented in .cpp file, AVX2 - in .asm. PlainC realizations are the next:
bool convertYUV420PToP010_PlainC(
    uint8_t const* src_y, int32_t const src_stride_y,
    uint8_t const* src_u, int32_t const src_stride_u,
    uint8_t const* src_v, int32_t const src_stride_v,
    uint8_t* dst_y, int32_t const dst_stride_y,
    uint8_t* dst_uv, int32_t const dst_stride_uv,
    int32_t const width, int32_t const height){
for (int32_t y = 0; y < height; y++)
    {
        const auto p_src_y = (src_y + y * src_stride_y);
        uint16_t* p_dst_y = reinterpret_cast<uint16_t*>(dst_y + y * dst_stride_y);
        for (int32_t x = 0; x < width; x++)
        {
            p_dst_y[x] = static_cast<uint16_t>(p_src_y[x]) << 8;
        }
    }
    for (int32_t y = 0; y < height / 2; y++)
    {
        const auto p_src_u = (src_u + (y * src_stride_u));
        const auto p_src_v = (src_v + (y  * src_stride_v));
        uint16_t* p_dst_uv = reinterpret_cast<uint16_t*>(dst_uv + y  * dst_stride_uv);
        for (int32_t x = 0; x < width / 2; x++)
        {
            p_dst_uv[0] = static_cast<uint16_t>(p_src_u[x]) << 8;
            p_dst_uv[1] = static_cast<uint16_t>(p_src_v[x]) << 8;
            p_dst_uv += 2;
        }
    }
    return true;
}
For AVX2 functions make visible external function definition.
global convertYUV420PToUYVY422_AVX2
global convertYUV420PToP010_AVX2
Passing arguments to registers on Windows and Linux is in different ways.
How it works on Windows according to the Calling Convention: look at part of the color conversion function implementation below. We can use sixteen 64-bit registers: %rax, %rcx, %rdx, %r8, %r9, %r10, %r11, %r12, %r13, %r14, %r15, %rdi, %rsi, %rbx, %rbp, %rsp. According to the calling convention, four registers such as %rcx, %rdx, %r8, %r9 are used by default. It means that the first four function arguments are passed to these registers. The remaining arguments are passed on the stack. If the return value is used in a function, we save it through the %rax register. Next we would like to add about the nonvolatile registers group: %rbx, %rbp, %rdi, %rsi, %rsp, %r12, %r13, %r14, %r15. %r10 and %r11 registers must be preserved as needed by the caller. Such registers should be saved and restored by the function. %rsp is used as a stack pointer. %rbp register may be used as a frame pointer.
;---------------------------------------------------------------------------------------------------------------
; bool  __fastcall convertYUV420PToP010_AVX2(uint8_t const* src_y, int32_t const src_stride_y, uint8_t const* src_u, int32_t const src_stride_u, uint8_t const* src_v, int32_t const src_stride_v, uint8_t* dst_y, int32_t const dst_stride_y, uint8_t* dst_uv, int32_t const dst_stride_uv, int32_t const width, int32_t const height);
;---------------------------------------------------------------------------------------------------------------
ALIGN 32
vq_convertYUV420PToP010_AVX2:

%assign STACK_PARAMS_BASE_OFFSET 28h

push     r12  ; save registers
push     r13
push     r14
push     r15
push     rdi
push     rsi
push     rbx

%xdefine    src_y            rcx ; redefine argument alias to register
%xdefine    src_stride_y     rdx
%xdefine    src_u            r8
%xdefine    src_stride_u     r9
%xdefine    src_v            r10
mov         r10,             QWORD[rsp+STACK_PARAMS_BASE_OFFSET] ; argument passed via stack
%xdefine    src_stride_v     r11
mov         r11d,            DWORD[rsp+STACK_PARAMS_BASE_OFFSET + 8]
%xdefine    dst_y            rax
mov         rax,             QWORD[rsp+STACK_PARAMS_BASE_OFFSET + 16]
%xdefine    dst_stride_y     r12
mov         r12d,            DWORD[rsp+STACK_PARAMS_BASE_OFFSET + 24]
%xdefine    dst_uv           r13
mov         r13,             QWORD[rsp+STACK_PARAMS_BASE_OFFSET + 32]
%xdefine    dst_stride_uv    r14
mov         r14d,            DWORD[rsp+STACK_PARAMS_BASE_OFFSET + 40]
%xdefine    width            r15
mov         r15d,            DWORD[rsp+STACK_PARAMS_BASE_OFFSET + 48]
%xdefine    height           rdi
mov         edi,             DWORD[rsp+STACK_PARAMS_BASE_OFFSET + 56]

%xdefine    p_src            rsi ; define local variables
%xdefine    p_dst            rbx
What about Linux register usage? We can use sixteen 64-bit registers: %rax, %rcx, %rdx, %rbx, %rsi, %rdi, %rsp, %rbp, %r8, %r9, %r10, %r11, %r12, %r13, %r14, %r15. As a rule, %rax is used to save a return value if it is used in the function. %rsp is used as a pointer to the top stack element. %rbx, %r12, %r13, %r14, %r15 registers are saved across function calls. %rdi, %rsi, %rdx, %rcx, %r8, %r9 registers are used to place the first six function parameters. Other parameters are pushed on the stack.
;---------------------------------------------------------------------------------------------------------------
; bool  __fastcall convertYUV420PToP010_AVX2(uint8_t const* src_y, int32_t const src_stride_y, uint8_t const* src_u, int32_t const src_stride_u, uint8_t const* src_v, int32_t const src_stride_v, uint8_t* dst_y, int32_t const dst_stride_y, uint8_t* dst_uv, int32_t const dst_stride_uv, int32_t const width, int32_t const height);
;---------------------------------------------------------------------------------------------------------------
ALIGN 32
vq_convertYUV420PToP010_AVX2:

push     rbx    ; save registers
push     r12
push     r13
push     r14
push     r15

%xdefine    src_y           rdi  ; redefine argument alias to register
%xdefine    src_stride_y    rsi
%xdefine    src_u           rdx
%xdefine    src_stride_u    rcx
%xdefine    src_v           r8
%xdefine    src_stride_v    r9
%xdefine    dst_y           rax
mov         rax,            QWORD[rsp+STACK_PARAMS_BASE_OFFSET ] ; argument passed via stack
%xdefine    dst_stride_y    r10
mov         r10d,           DWORD[rsp+STACK_PARAMS_BASE_OFFSET + 8]
%xdefine    dst_uv          r11
mov         r11,            QWORD[rsp+STACK_PARAMS_BASE_OFFSET + 16]
%xdefine    dst_stride_uv   rbx
mov         ebx,            DWORD[rsp+STACK_PARAMS_BASE_OFFSET + 24]
%xdefine    width           r12
mov         r12d,           DWORD[rsp+STACK_PARAMS_BASE_OFFSET + 32]
%xdefine    height          r13
mov         r13d,           DWORD[rsp+STACK_PARAMS_BASE_OFFSET + 40]

%xdefine    p_src           r14 ; define local variables
%xdefine    p_dst           r15
Alternatively, you can use the __cdecl - default calling convention for C and C++ programs. The main difference from __fastcall is that all arguments are passed on the stack. On Windows we can define __cdecl, keywords throw the DEF_CDECL, on Linux - attribute((__cdecl))
#if PLATFORM_WINDOWS
#define DEF_CDECL __cdecl
#else
#define DEF_CDECL  __attribute__((cdecl))
#endif
Functions are defined in the same way as in the __fastcall case. Let's show an example of one pair of functions.
extern "C" bool  DEF_CDECL convertYUV420PToP010_PlainC(
    uint8_t const* src_y, int32_t const src_stride_y,
    uint8_t const* src_u, int32_t const src_stride_u,
    uint8_t const* src_v, int32_t const src_stride_v,
    uint8_t * dst_y, int32_t const dst_stride_y,
    uint8_t * dst_uv, int32_t const dst_stride_uv,
    int32_t const width, int32_t const height);
extern "C" bool  DEF_CDECL convertYUV420PToP010_AVX2(
    uint8_t const* src_y, int32_t const src_stride_y,
    uint8_t const* src_u, int32_t const src_stride_u,
    uint8_t const* src_v, int32_t const src_stride_v,
    uint8_t * dst_y, int32_t const dst_stride_y,
    uint8_t * dst_uv, int32_t const dst_stride_uv,
    int32_t const width, int32_t const height);
Results
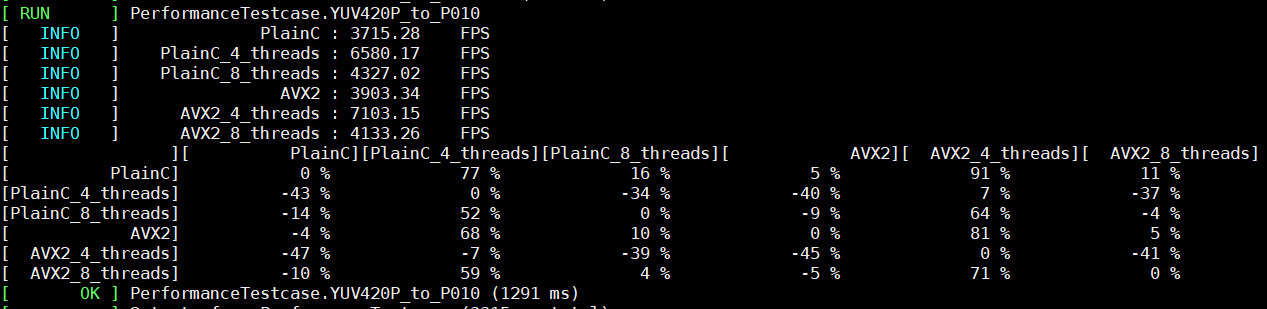
For example, we took two color conversion functions from YUV420P to P010 and from YUV420P to UYVY422 on 1, 4, and 8 threads. The performance results on Windows are shown in the figure below.
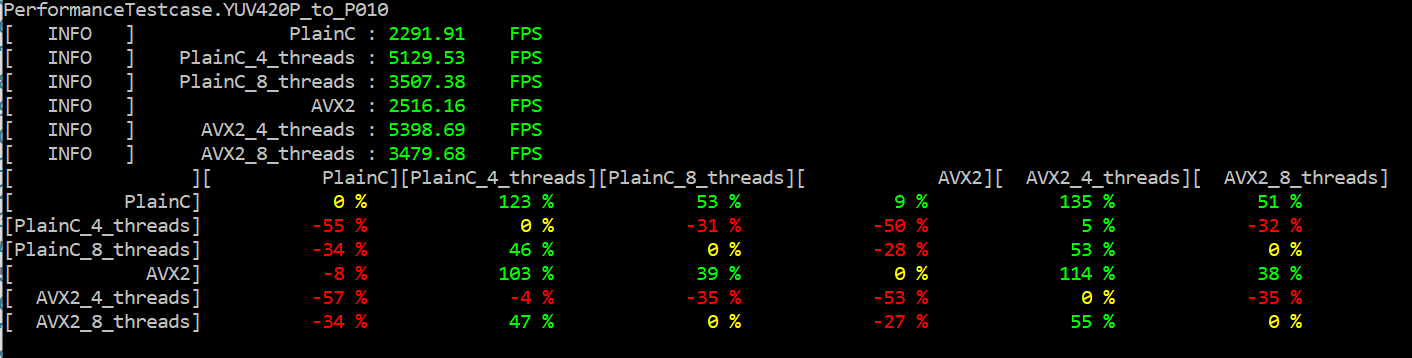
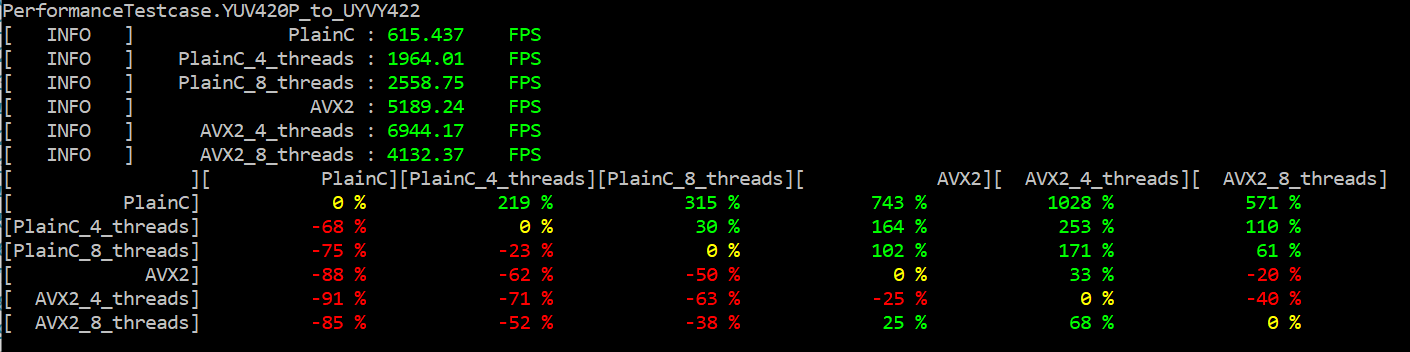
The performance results for Linux are demonstrated below. We see the performance increase on the comparison table for the color conversion function from YUV420P to UYVY422 on Assembler. It is conditioned by the algorithm conversion complexity. Conversion from YUV420P to P010 is more elementary, and it shows an insignificant performance increase on one thread for AVX2 implementation.
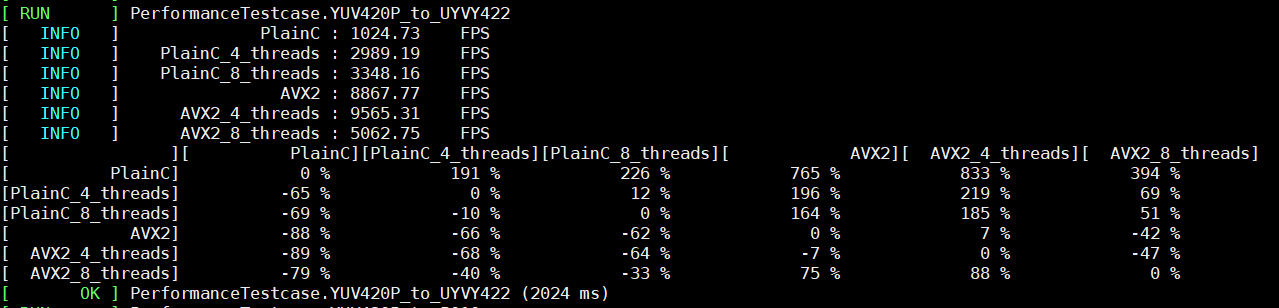
If we compare PlainC vs. AVX2 and PlainC vs. AVX2_4_threads on color conversion from YUV420p to UYVY422, then observe that AVX2 on one thread works faster than on 4 or 8 threads.
We can observe from the results that the acceleration of conversion from YUV420P to P010 with the Assembler is not as good as YUV420p to UYVY422 one. To explain this, we will look at the PlainC versions of these functions and see how the compiler disassembled them.
The pictures below show the color conversion from YUV420p to P010. The left one is what the compiler did, and the right one is our AVX2 version.
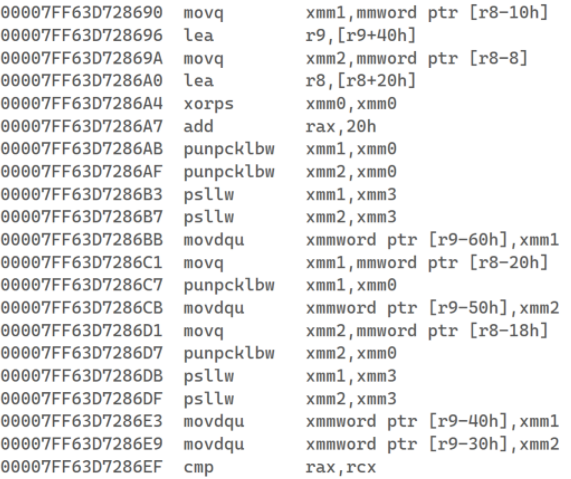 |
|
We can see that the compiler also uses vector instructions during compilation. And since the function is quite simple, the speed gain is insignificant compared to the manually written function, as can be seen from the results. From this, we can conclude that optimizing the code using Assembler will not give much benefit in case of simple functions. However, the situation with more complex functions is different. The compiler can lose in optimization of a manually written function. As shown in the results, the increase was significant in the YUV420p to UYVY422 case.
IntelⓇ Architecture Code Analyzer
We decided to check the performance results and compare them with the throughput report which we got with Architecture Code Analyzer. IntelⓇ Architecture Code Analyzer can analyze the throughput block of code. Look at the Code Analyzer tool output.

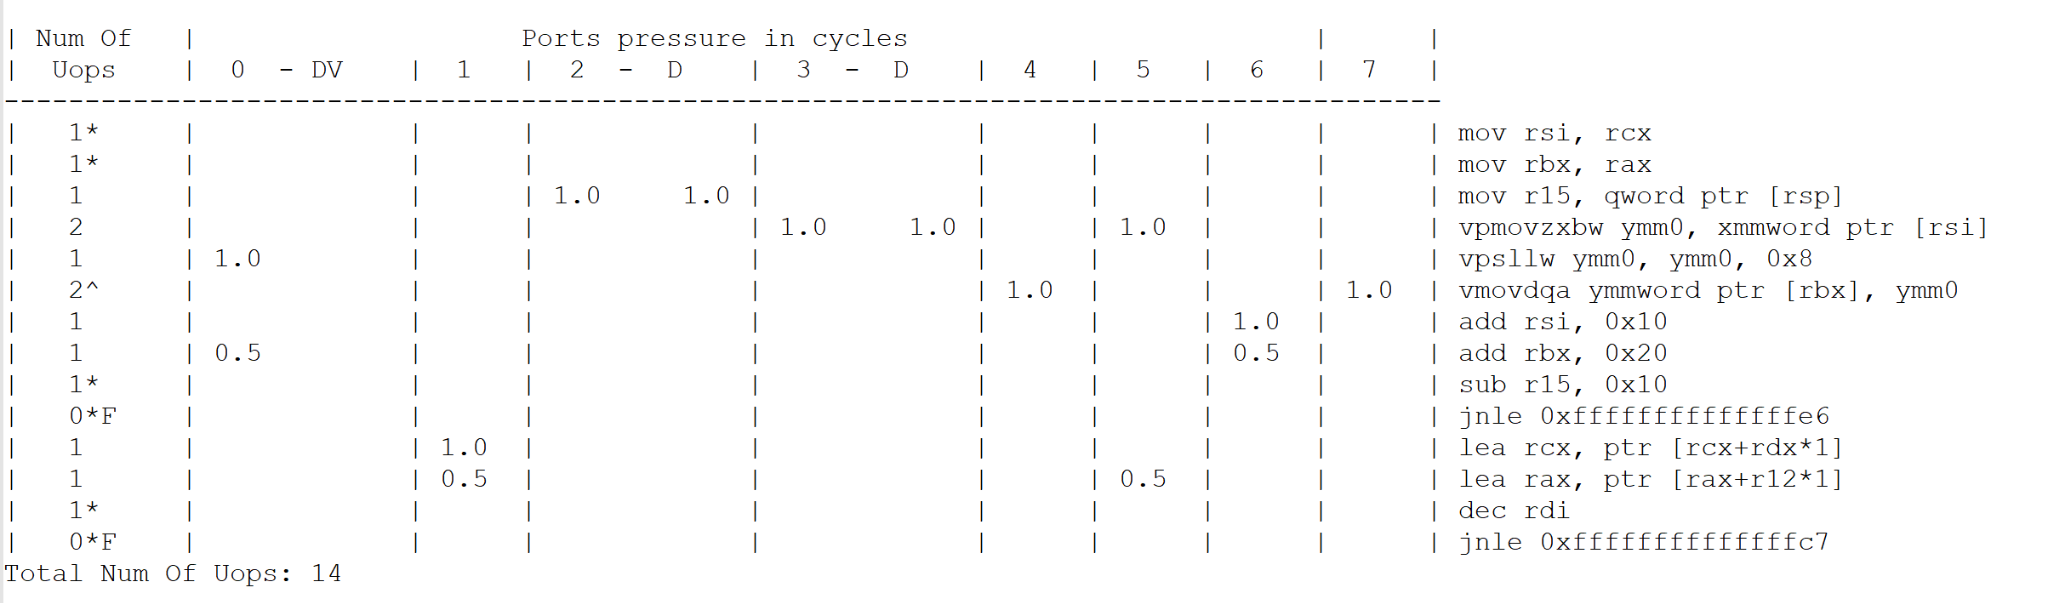
Obviously, if the throughput bottleneck is a frontend, it means we don't have any data dependency.
Conclusion
Studying Assembler offers many benefits in and by itself:
- you will learn how the CPU and the RAM work;
- you will learn how the computer and the operating system work together;
- you will understand how high-level language compilers generate code machine language, and this knowledge can help you write more efficient code;
- you will have a more effective means of analyzing errors in programs;
But, as we have shown in this article, sometimes using Assembler can be reasonable, and sometimes it can waste a lot of your nerves and can even slow down your functionality. In the case of relatively simple programs, rewriting the code with assembly language is unlikely to bring any advantage over C++. However, in more complex programs, using Assembler is likely to give a significant speed advantage. A critical moment was that AVX2 instructions work poorly with virtual threads.
If our article has inspired you to get into Assembler, the best place to start is with the Intel Reference Guide. You can find this one in the link below:
https://software.intel.com/en-us/articles/intel-sdm
Also, a helpful source of information can be found here:
https://www.felixcloutier.com/x86/
This site provides a list of all instructions with brief descriptions of their usage.