3 Cases from a Video Expert: Encoding Basis

https://www.youtube.com/watch?v=Gr6U4ypFITE Introduction At ViCueSoft we have a huge amount of expertise in video encoding which we would like to share with you. Starting with this article, we’re launching a series of articles with a number of real and practical usage examples, and we will explain these cases clearly. Please don’t hesitate to ask any questions in the comments below, and feel free to write an email to the author.
Basics
There are some basics that I would like to start with. These basics will help you to get a clear understanding of the forthcoming articles. I will also introduce some basic terms that we will be using very often, so I would like to make sure that we’re on the same page. Moreover, I will share some handy yet professional tools that will be very useful in our case studies.
So, let’s get started!
First of all, let’s introduce the most basic of the basics:
Encoding is the process of converting any kind of information to a new form so that it requires much less memory space and, at the same time, it saves (almost) the same amount of information while being decoded.
Video encoding is encoding of video data, obviously.
There are two groups of encoding (the almost above is referring exactly to this): lossless is when we encode without losing any single byte of the source information, and lossy is when some information is lost during the encoding-decoding cycle. How much is lost? It depends on the encoding parameters. We will discuss this later in the article.
The next load of t terms:
With the term codec we assume a set of agreements as to how exactly we transform the uncompressed data to encoded data and, vice versa, decode them back. In the professional world we call these agreements standards. Good examples are: ITU-T H.264, ITU-T H.265, ISO/IEC 11172: Part 2 and many others.
A video encoder is a piece of software that encodes video from an uncompressed format to an encoded format. It’s just an implementation of a codec according to the standard.
video decoder software decodes video from the encoded format back to uncompressed video data.
uncompressed video data is the data taken from a camera or any other device, or stored in any initial form and not being processed. It’s mainly represented in the form of YUV files. There are some well-known sets of uncompressed video streams that we will use widely in this series of articles.
Y4M is a format that is widely used. It’s just a regular YUV file but with additional information about width, height, and format inside the file.
An uncompressed video stream is a file with uncompressed video data.
A video elementary stream (VES) is the bitstream (to simplify — a file) encoded by a video encoder.
Tools
Let’s get an overview of some software tools that we will use in the series of articles.
FFmpeg is a well-known open source framework, designed to encode and decode video, audio and other multimedia data as well as to perform other multimedia operations, such as streaming, etc.
The VQ Analyzer is a professional tool for deep analysis of video streams, that supports a wide range of codecs such as VVC, AV1, HEVC, AVC, VP-9 and MPEG-2 Video.
VQ Probe is a professional tool for video quality comparison as well as for video metrics calculation.
The 3 cases
I hope the introduction was clear to you and we’re now on the same page. Let’s start with the first 3 cases of the week.
Let’s begin with the following simpler items:
- find an uncompressed file
- encode it with different settings
- compare the outputs
- summarize the results
First of all, please make sure you have FFmpeg installed in your system. To check, just type the following command in your terminal:
ffmpeg
If you get something like this:
ffmpeg version 4.2.2 Copyright © 2000–2019 the FFmpeg developers

built with Apple clang version 11.0.0 (clang-1100.0.33.16)

configuration: — prefix=/usr/local/Cellar/ffmpeg/4.2.2_1 — enable-shared — enable-pthreads — enable-version3 — enable-avresample — cc=clang — host-cflags=’-I/Library/Java/JavaVirtualMachines/adoptopenjdk-13.0.1.jdk/Contents/Home/include -I/Library/Java/JavaVirtualMachines/adoptopenjdk-13.0.1.jdk/Contents/Home/include/darwin -fno-stack-check’ — host-ldflags= — enable-ffplay — enable-gnutls — enable-gpl — enable-libaom — enable-libbluray — enable-libmp3lame — enable-libopus — enable-librubberband — enable-libsnappy — enable-libtesseract — enable-libtheora — enable-libvidstab — enable-libvorbis — enable-libvpx — enable-libwebp — enable-libx264 — enable-libx265 — enable-libxvid — enable-lzma — enable-libfontconfig — enable-libfreetype — enable-frei0r — enable-libass — enable-libopencore-amrnb — enable-libopencore-amrwb — enable-libopenjpeg — enable-librtmp — enable-libspeex — enable-libsoxr — enable-videotoolbox — disable-libjack — disable-indev=jack

libavutil 56. 31.100 / 56. 31.100

libavcodec 58. 54.100 / 58. 54.100

libavformat 58. 29.100 / 58. 29.100

libavdevice 58. 8.100 / 58. 8.100

libavfilter 7. 57.100 / 7. 57.100

libavresample 4. 0. 0 / 4. 0. 0

libswscale 5. 5.100 / 5. 5.100

libswresample 3. 5.100 / 3. 5.100

libpostproc 55. 5.100 / 55. 5.100

Hyper fast Audio and Video encoder

usage: ffmpeg [options] [[infile options] -i infile]… {[outfile options] outfile}…
then FFmpeg is installed and ready to use on your system.
We're now ready to proceed to the first step.
1. find an uncompressed file
As mentioned earlier, there are many storages of uncompressed data. I will use https://media.xiph.org/video/derf/ and a specific file tractor from there.
2. encode it with different settings
I have FFmpeg already installed on my Mac. If you do not, please follow the instructions at FFmpeg homepage to install it.
Go to the folder you want the output videos to be saved to. I will use ~/streams/raw/ as the folder where uncompressed video files are stored for me. Please replace it with your own specific directory.
*ffmpeg -i ~/streams/raw/tractor_1080p25.y4m -c:v libx264 -b:v 100k -frames 300 tractor_1080p25_encoded_100kbps.h264*
Following is a step-by-step guide:
ffmpeg specifies the program that we will use to encode our video.
-i input/tractor_1080p25.y4m sets the input file. In our case this is an uncompressed video.
-c:v libx264 means we will encode by using video encoder libx264 which is an implementation of H.264 (aka AVC) codec.
-b:v 100k: this is the essence of the whole article! That parameter sets the encoder to encode with the desired bitrate (100 kilobits per second, or 100 kbps) which means how many bits will be used to get 1 seconds of output video. With this article’s 3 cases we’ll see how that parameter affects the video.
-frames 300 means that we will encode only 300 frames. That’s quite enough for us in this article. On the other hand, it will take much less time to encode.
tractor_1080p25_encoded_100kbps.h264 is the output file name. I recommend you include specific settings used to encode the file. Later, when you have dozens of encoded files, it will be easier to realize what is specific to a single encoded file.
Now we will encode 3 cases of the article. That’s the essence of the article. So here we go.
Case 1: encode with as much low bitrate as we can imagine — just 100 kbps
ffmpeg -i input/tractor_1080p25.y4m -c:v libx264 -b:v 100k -frames 300 tractor_1080p25_encoded_100kbps.h264
I will demonstrate the example of log output once. All subsequent encodings in this article should be very similar:
ffmpeg version 4.2.2 Copyright © 2000–2019 the FFmpeg developers

built with Apple clang version 11.0.0 (clang-1100.0.33.16)

configuration: — prefix=/usr/local/Cellar/ffmpeg/4.2.2_1 — enable-shared — enable-pthreads — enable-version3 — enable-avresample — cc=clang — host-cflags=’-I/Library/Java/JavaVirtualMachines/adoptopenjdk-13.0.1.jdk/Contents/Home/include -I/Library/Java/JavaVirtualMachines/adoptopenjdk-13.0.1.jdk/Contents/Home/include/darwin -fno-stack-check’ — host-ldflags= — enable-ffplay — enable-gnutls — enable-gpl — enable-libaom — enable-libbluray — enable-libmp3lame — enable-libopus — enable-librubberband — enable-libsnappy — enable-libtesseract — enable-libtheora — enable-libvidstab — enable-libvorbis — enable-libvpx — enable-libwebp — enable-libx264 — enable-libx265 — enable-libxvid — enable-lzma — enable-libfontconfig — enable-libfreetype — enable-frei0r — enable-libass — enable-libopencore-amrnb — enable-libopencore-amrwb — enable-libopenjpeg — enable-librtmp — enable-libspeex — enable-libsoxr — enable-videotoolbox — disable-libjack — disable-indev=jack

libavutil 56. 31.100 / 56. 31.100

libavcodec 58. 54.100 / 58. 54.100

libavformat 58. 29.100 / 58. 29.100

libavdevice 58. 8.100 / 58. 8.100

libavfilter 7. 57.100 / 7. 57.100

libavresample 4. 0. 0 / 4. 0. 0

libswscale 5. 5.100 / 5. 5.100

libswresample 3. 5.100 / 3. 5.100

libpostproc 55. 5.100 / 55. 5.100

Input #0, yuv4mpegpipe, from ‘/Users/dipaolo/streams/raw/tractor_1080p25.y4m’:

Duration: 00:00:27.60, start: 0.000000, bitrate: 622081 kb/s

Stream #0:0: Video: rawvideo (I420 / 0x30323449), yuv420p(progressive), 1920x1080, SAR 1:1 DAR 16:9, 25 fps, 25 tbr, 25 tbn, 25 tbc

Stream mapping:

Stream #0:0 -> #0:0 (rawvideo (native) -> h264 (libx264))

Press [q] to stop, [?] for help

[libx264 @ 0x7fc268008e00] using SAR=1/1

[libx264 @ 0x7fc268008e00] using cpu capabilities: MMX2 SSE2Fast SSSE3 SSE4.2 AVX FMA3 BMI2 AVX2

[libx264 @ 0x7fc268008e00] profile High, level 4.0

Output #0, h264, to ‘tractor_1080p25_encoded_100kbps.h264’:

Metadata:

encoder : Lavf58.29.100

Stream #0:0: Video: h264 (libx264), yuv420p, 1920x1080 [SAR 1:1 DAR 16:9], q=-1–1, 100 >kb/s, 25 fps, 25 tbn, 25 tbc

Metadata:

encoder : Lavc58.54.100 libx264

Side data:

cpb: bitrate max/min/avg: 0/0/100000 buffer size: 0 vbv_delay: -1

frame= 300 fps= 82 q=-1.0 Lsize= 175kB time=00:00:11.92 bitrate= 120.0kbits/s speed=3.27x

video:175kB audio:0kB subtitle:0kB other streams:0kB global headers:0kB muxing overhead: >0.000000%

[libx264 @ 0x7fc268008e00] frame I:2 Avg QP:50.99 size: 5304

[libx264 @ 0x7fc268008e00] frame P:95 Avg QP:51.00 size: 1608

[libx264 @ 0x7fc268008e00] frame B:203 Avg QP:51.00 size: 76

[libx264 @ 0x7fc268008e00] consecutive B-frames: 1.3% 15.3% 30.0% 53.3%

[libx264 @ 0x7fc268008e00] mb I I16..4: 65.9% 34.1% 0.0%

[libx264 @ 0x7fc268008e00] mb P I16..4: 6.1% 0.2% 0.0% P16..4: 7.6% 0.2% 3.0% 0.0% 0.0% >skip:82.9%

[libx264 @ 0x7fc268008e00] mb B I16..4: 0.0% 0.0% 0.0% B16..8: 0.1% 0.0% 0.0% direct: >0.0% skip:99.9% L0: 8.0% L1:92.0% BI: 0.0%

[libx264 @ 0x7fc268008e00] final ratefactor: 64.30

[libx264 @ 0x7fc268008e00] 8x8 transform intra:10.7% inter:100.0%

[libx264 @ 0x7fc268008e00] coded y,uvDC,uvAC intra: 1.0% 6.5% 0.0% inter: 0.0% 0.0% 0.0%

[libx264 @ 0x7fc268008e00] i16 v,h,dc,p: 89% 9% 1% 0%

[libx264 @ 0x7fc268008e00] i8 v,h,dc,ddl,ddr,vr,hd,vl,hu: 12% 12% 68% 1% 2% 1% 2% 1% 1%

[libx264 @ 0x7fc268008e00] i8c dc,h,v,p: 100% 0% 0% 0%

[libx264 @ 0x7fc268008e00] Weighted P-Frames: Y:1.1% UV:1.1%

[libx264 @ 0x7fc268008e00] ref P L0: 72.9% 0.4% 17.5% 9.2% 0.1%

[libx264 @ 0x7fc268008e00] ref B L0: 71.9% 3.8% 24.4%

[libx264 @ 0x7fc268008e00] ref B L1: 89.3% 10.7%

[libx264 @ 0x7fc268008e00] kb/s:119.19
If you see something very similar to this in your terminal then congratulations — you’ve just successfully encoded a file!
As a result we have the newly created file tractor_1080p25_encoded_100kbps.h264. Save it for the future. We will come back to it later.
Case 2: trying a much higher bitrate — 1000 kbps (or 1 Mbps) this time
ffmpeg -i ~/streams/raw/tractor_1080p25.y4m -c:v libx264 -b:v 1000k -frames 300 >tractor_1080p25_encoded_1000kbps_300frames.h264
Again, save the output for later use.
Case 3: the highest point in today’s cases — 10000 kbps (or 10 Mbps)
ffmpeg -i ~/streams/raw/tractor_1080p25.y4m -c:v libx264 -b:v 10000k -frames 300 tractor_1080p25_encoded_10000kbps_300frames.h264
Well, now we have three encoded files with different bitrates:
tractor_1080p25_encoded_100kbps_300frames.h264
tractor_1080p25_encoded_1000kbps_300frames.h264
tractor_1080p25_encoded_10000kbps_300frames.h264
3. compare the outputs
Now, when all the encoded files are ready, let’s see how they look and what the difference between them is.
I recommend you to use VQ Probe, a comprehensive way to visually compare two video files.
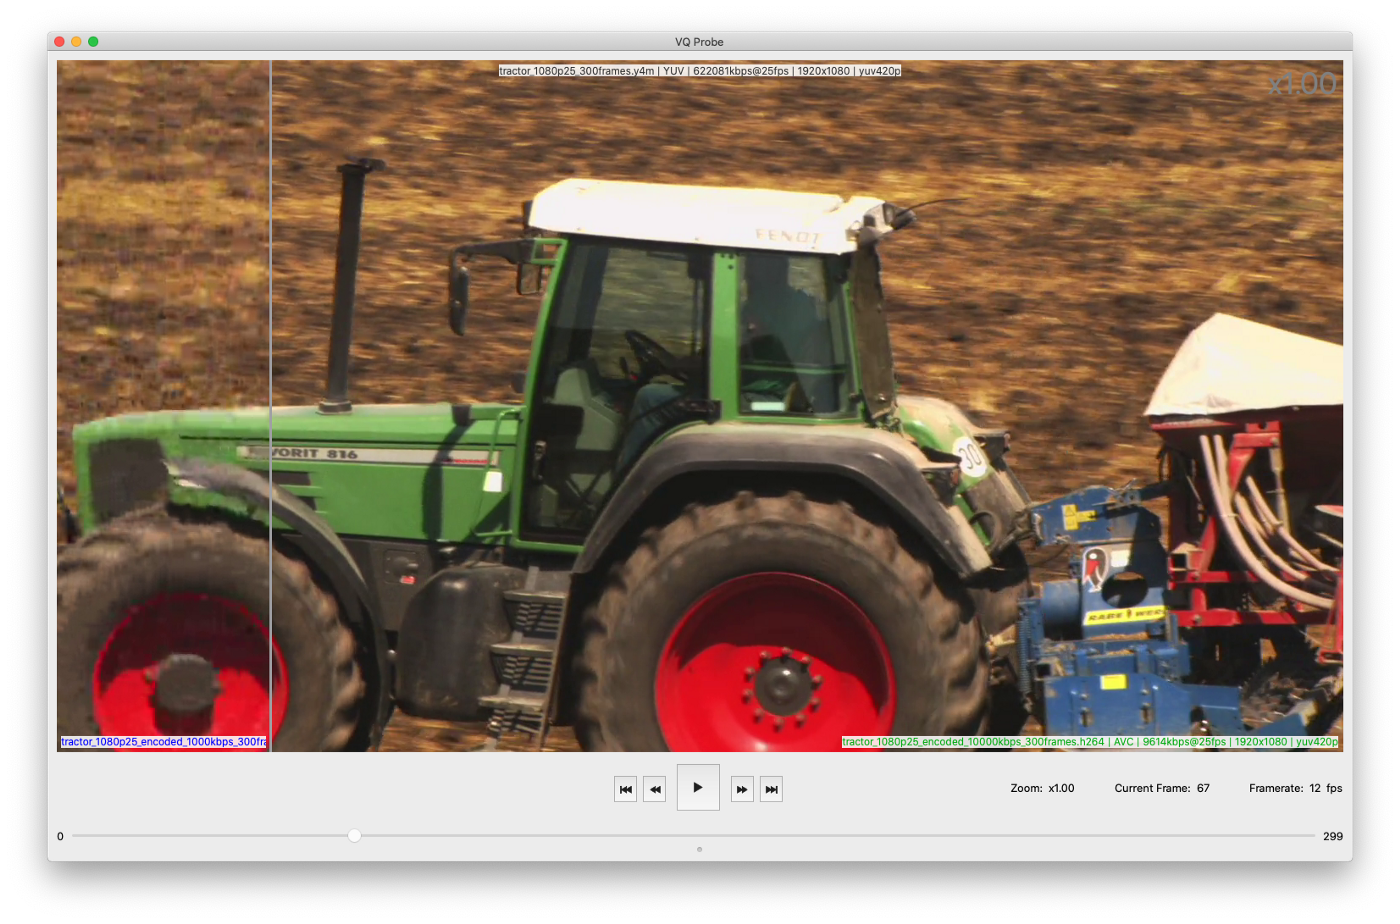
Let’s start with the first two files. I will open them along with the initial uncompressed video file (which is called the reference video file).
Note: I will not describe usage of the tool in details here. Please follow my another article for detailed guide and tips.
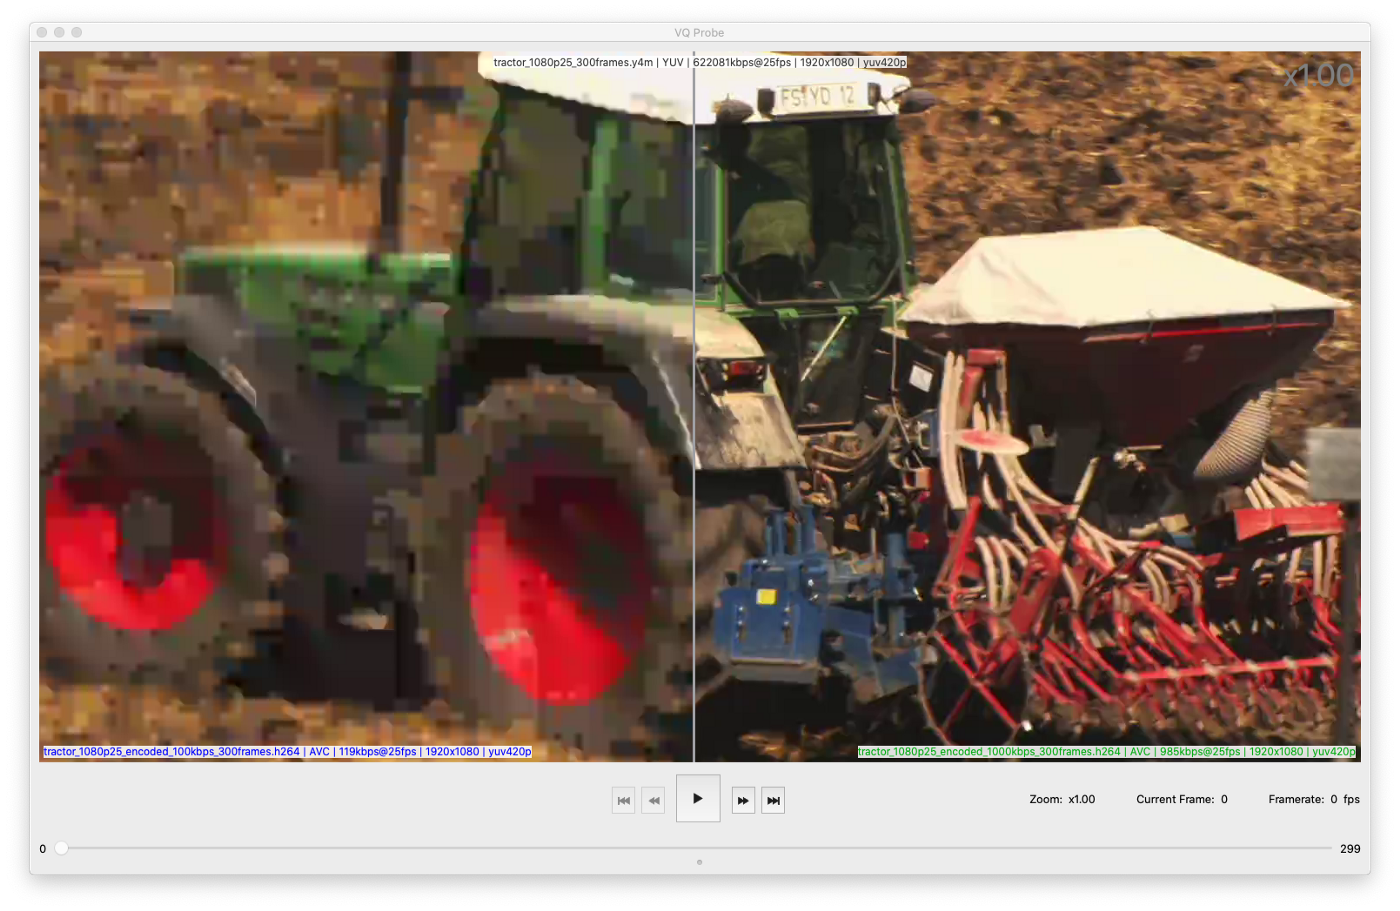

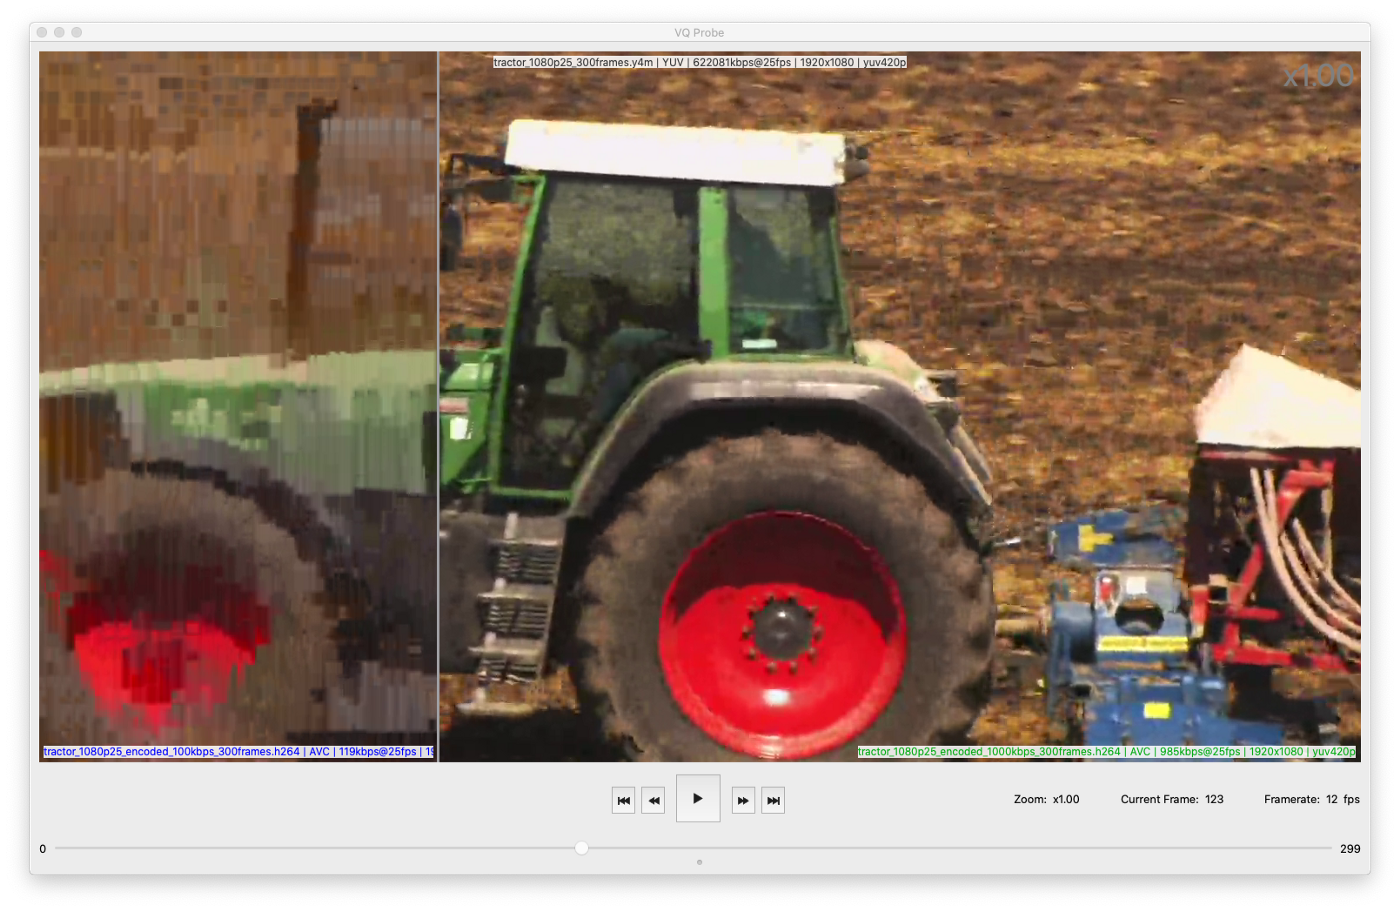
It’s obvious that the right part of the application’s window (that represents the file encoded with 1000 kbps) is much better that the left one (100 kbps). We can easily realize that just by visually looking at images and by playing back the two files simultaneously in VQ Probe.
Such visual comparison of video files is subjective when done by a human eye. There are several formalized methods and approaches to calculate video quality that use this kind of comparison. They are called subjective video quality metrics.
On the other hand, there is a set of objective quality metrics. Such metrics are based on mathematical algorithms and don’t require input from a human eye.
So, I invite you to take a look at PSNR metric as one of the most used objective video quality metrics. I will use VQ Probe again as a convenient tool to get different kinds of such metrics.
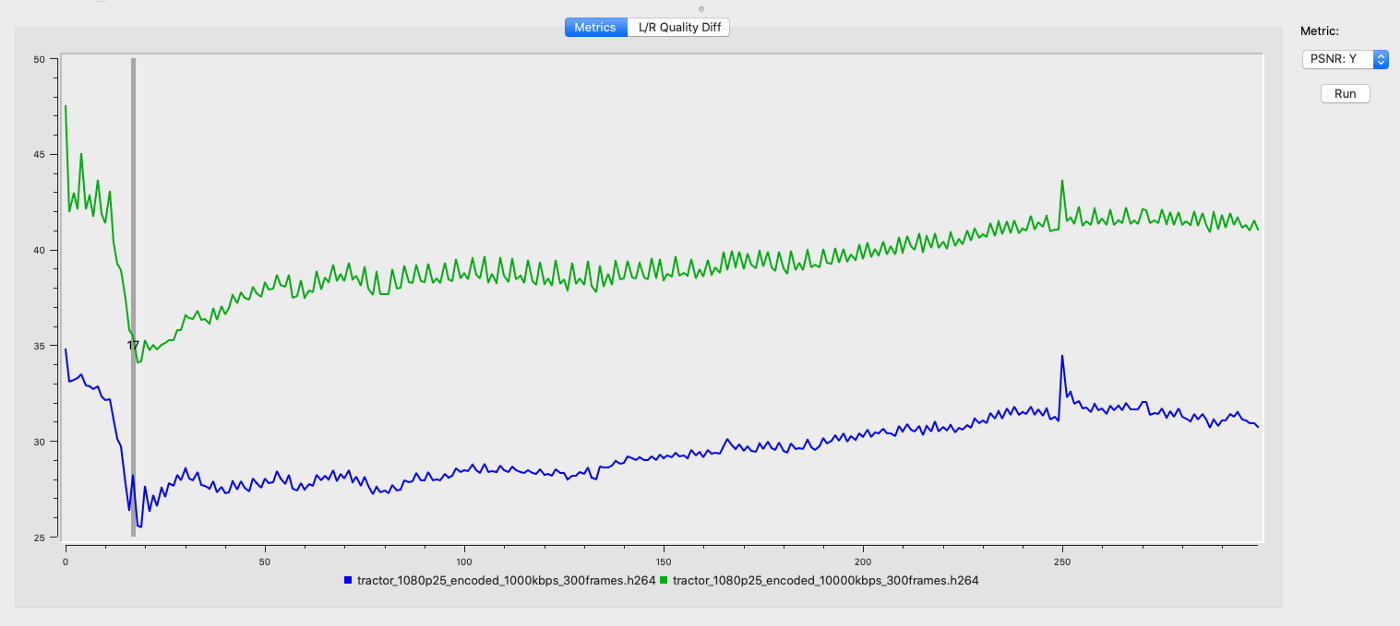
Here is the result for 100 kbps vs. 1000 kbps in terms of PSNR metric:
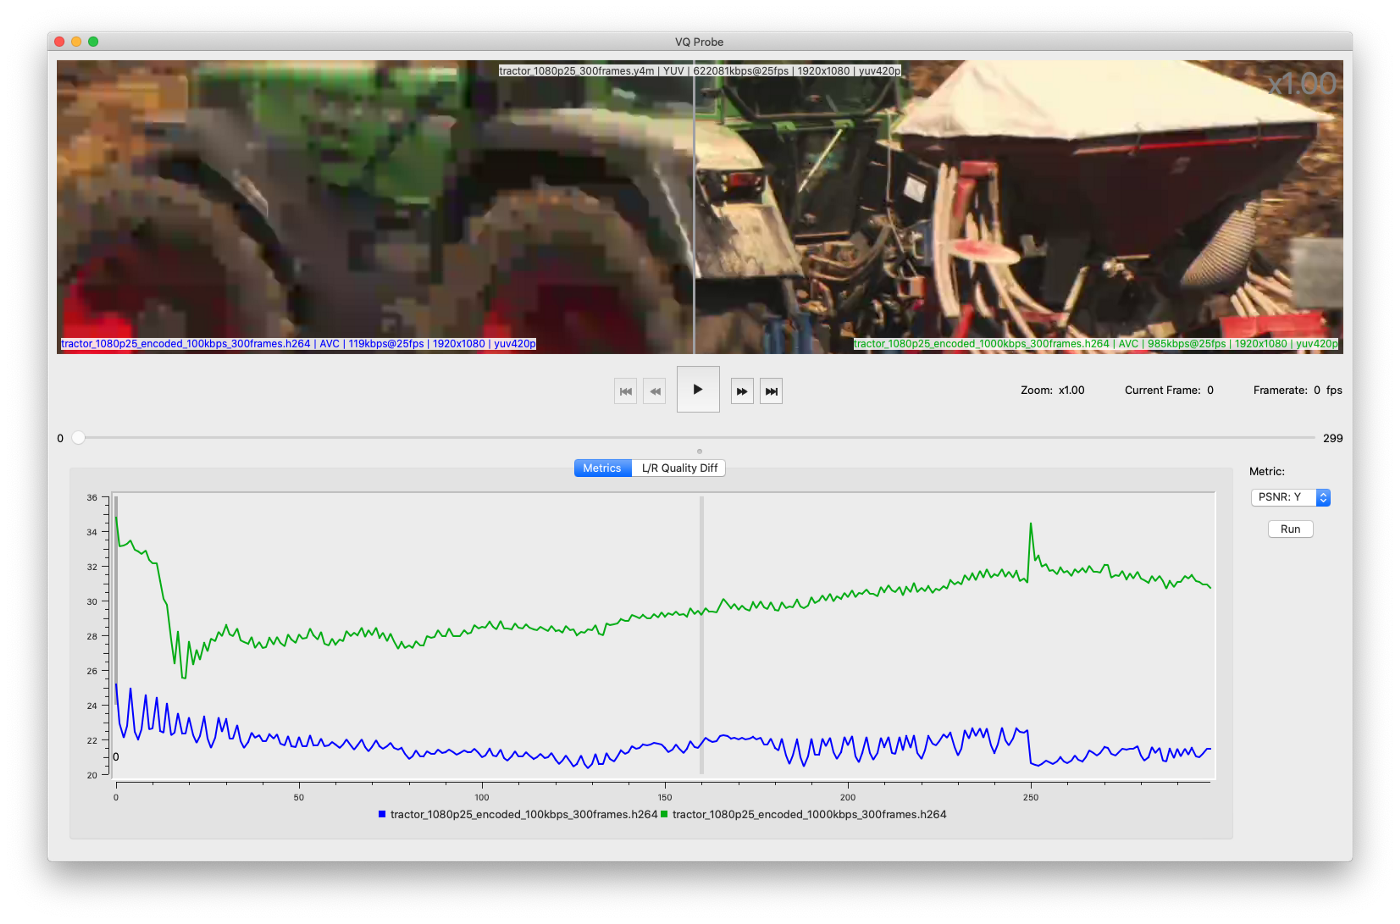
We see the blue line that represents our 100 kbps video. The green line shows the 1000 kbps file. You may notice a big difference between them. We will come back to it later. Now, let’s refer to the numbers.
Numbers start with 25.19 dB and 34.8 dB for blue and green curves, respectively.
Note: subjective video quality is measured in dB (decibels) and may vary from 0 (the worst quality ever) to 100 (the videos are the same). From here on out, I may skip writing dB after a quality metric value.
25.19 dB is very low level and unsuitable for real life usage. The number confirms our initial impression of the visual quality.
34.8 dB usually means quite acceptable quality. Again, we’ve seen the same when we look at the resulting video for the first time.
Here I should clarify why I said usually. This is because the numbers corresponding to good quality may vary depending on different factors, such as video resolution, content of the video, specific encoding parameters, etc. We will cover all these cases later in our series.
So, returning back to our PSNR numbers. We see that PSNR values vary during the videos: they go up and down, then up again and so on. The average numbers are about 22 dB and 30 dB for 100 kpbs file and 1000 kbps file, respectively.
As for the difference between green and blue lines. Let’s refer to the tab called L/R Quality Diff:
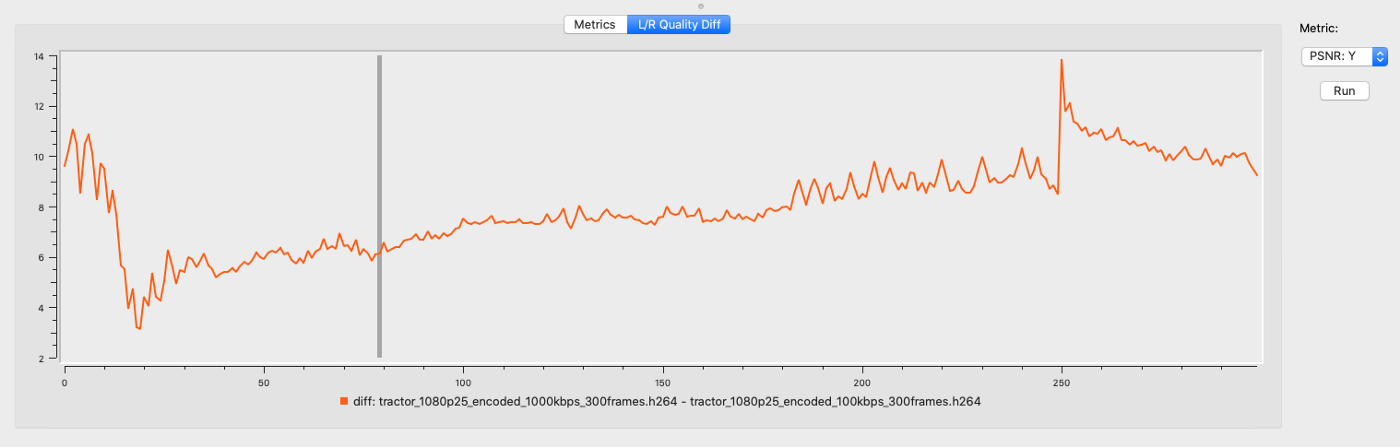
Here we can see the exact difference in PSNR values on every single frame. We can spot the minimal difference at frame number 19, which is 3.14 dB, while the maximum is placed at frame number 250 and the value equals 13.85 dB.
We can say that on average our encoded file with the bitrate of 1000 kbps is better than the encoded file with 100 kbps for about 8 dB. Which is, in fact, a very good result for the file encoded with 1000 kbps.
Let’s do the same comparison of the next two pairs: 1 Mbps and 10 Mbps. This comparison will contain fewer of my comments, since you already know enough to understand the things happening behind the scenes.
I will show you the results with just short comments.
As for the PSNR value, here they are:
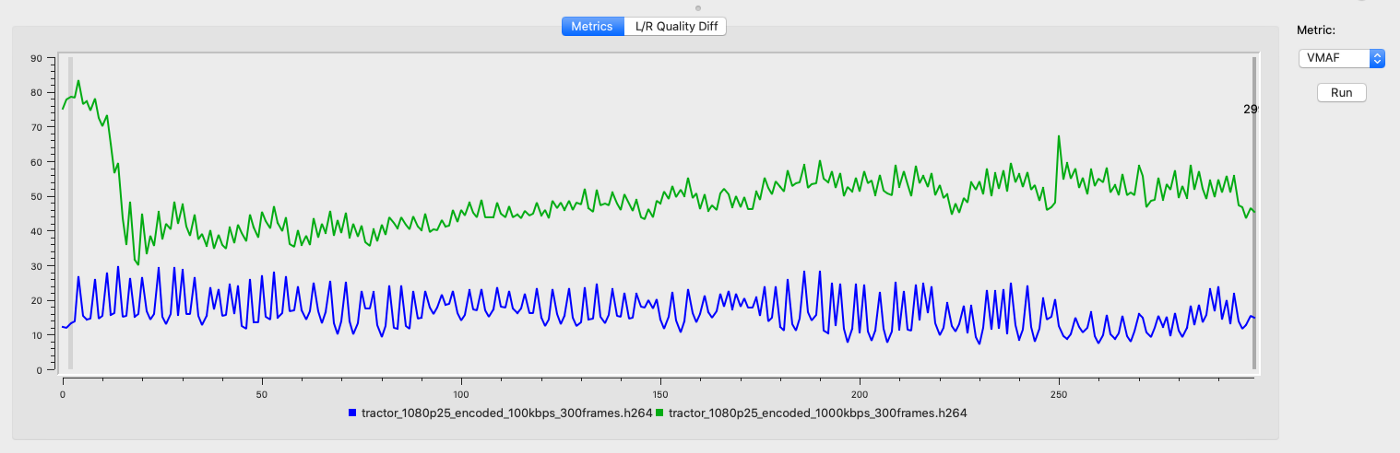
VMAF values are:
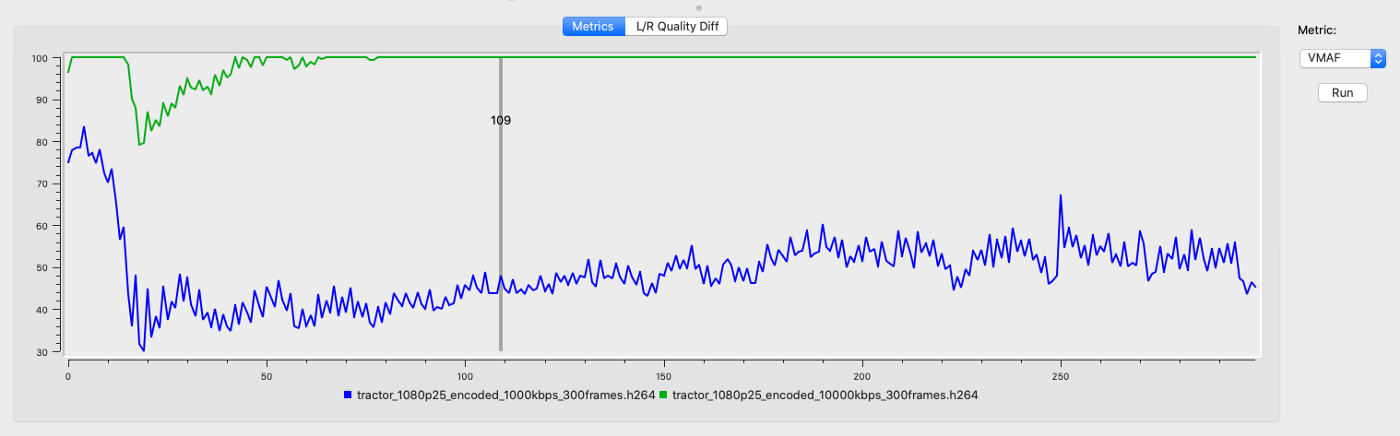
As you may see, it’s about 30 dB for 1000 kbps as we noticed before, and 40 dB for the file with the highest bitrate in our examples.
A quick look at difference of PSNR values:
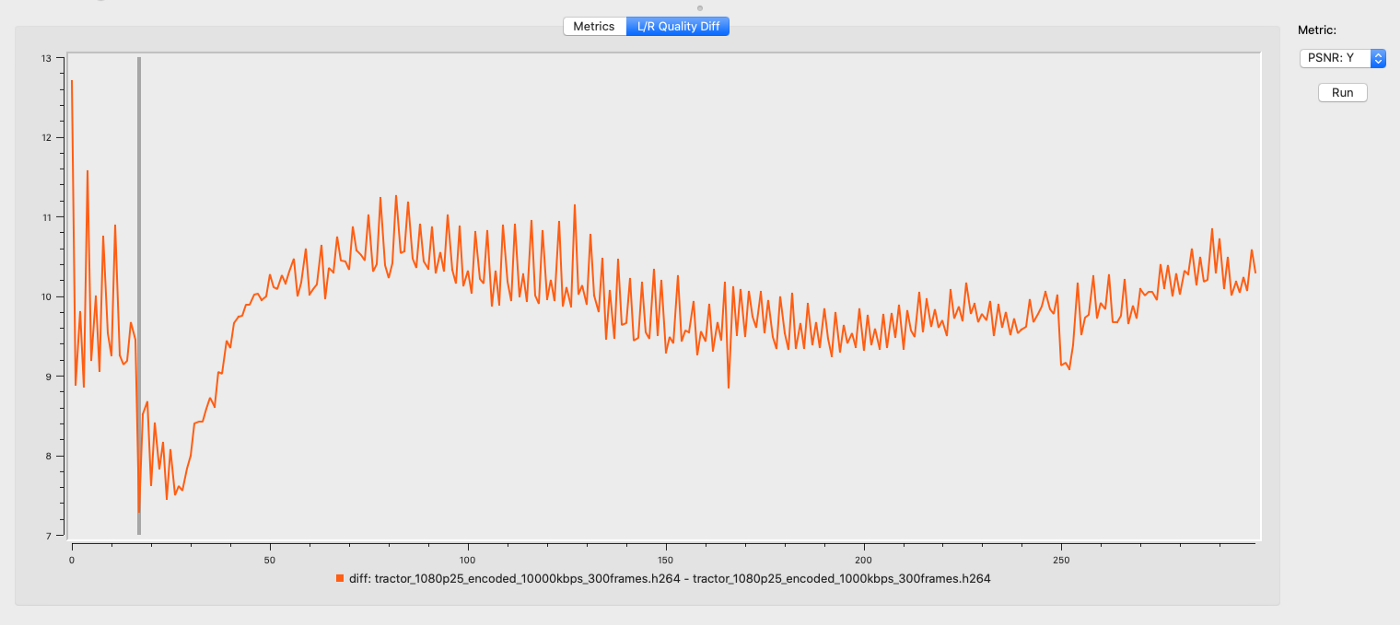
It’s around 10 dB difference between the 1 Mbps and the 10 Mbps file, which is a huge difference in fact.
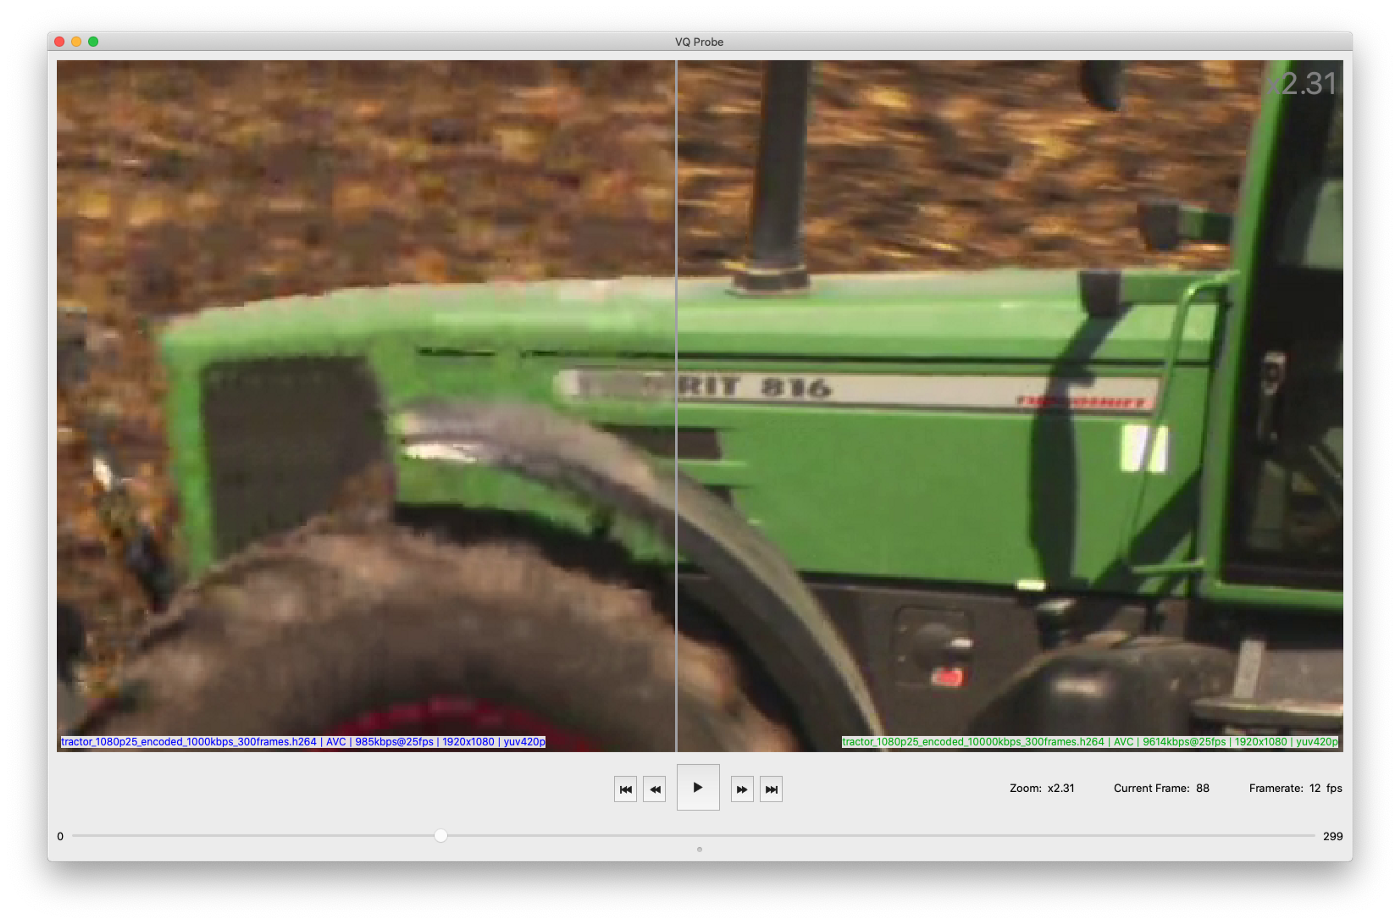
The visual difference between 1 Mbps and 10 Mbps exists for sure, but it’s not so huge as we’ve seen for 100 kbps vs. 1 Mbps before.
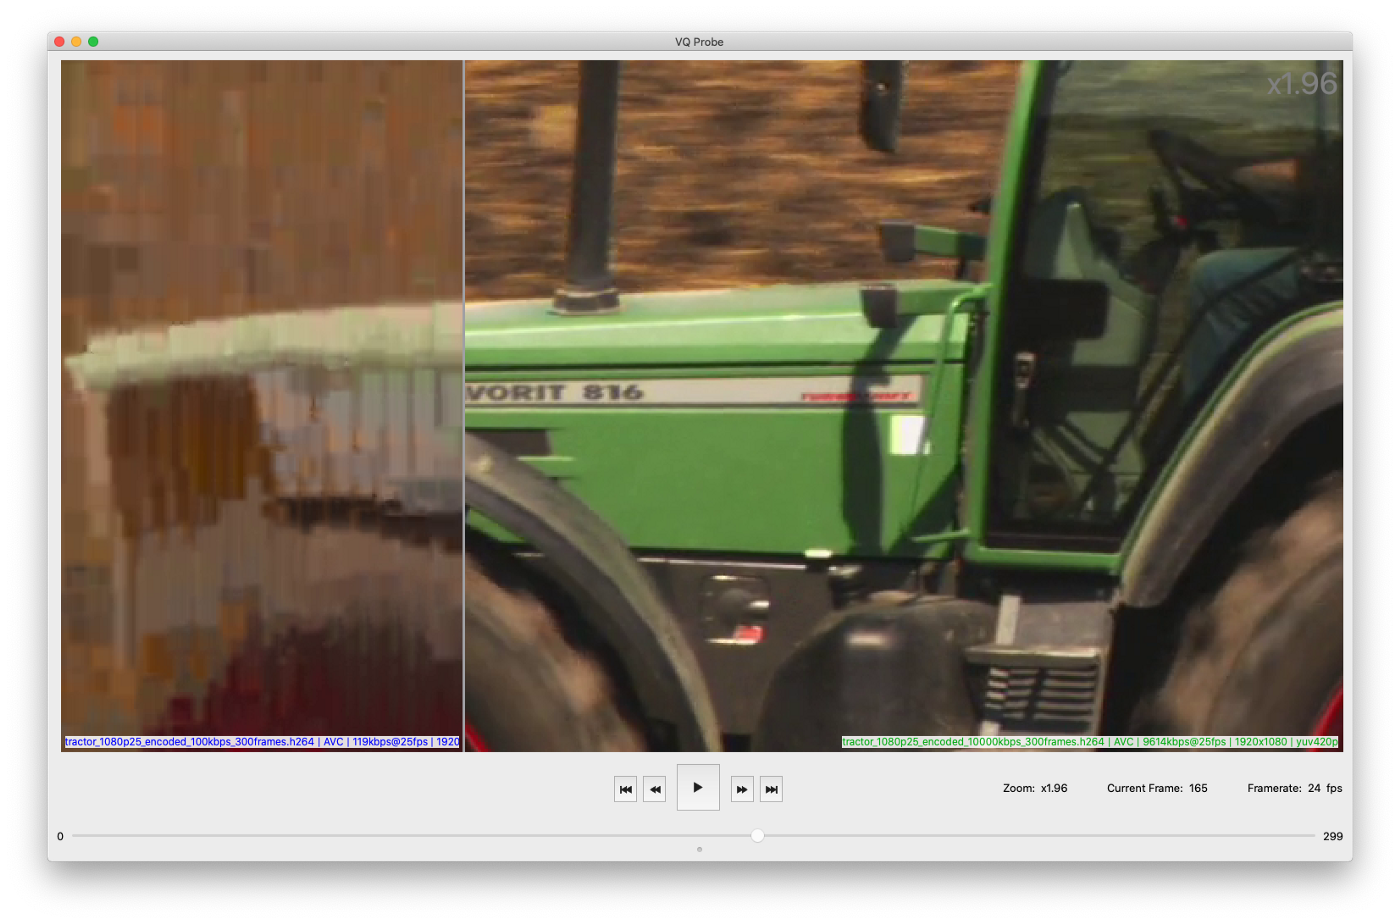
Here is, by the way, the visual difference between 100 kbps and 10000 kbps (100 times difference!):
4. summarize the results
I will put everything into one table to cover all the results at once:
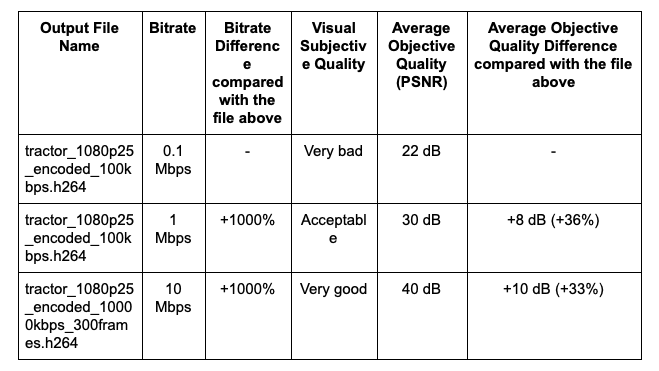
Nice. We have well-formed results. Let’s summarize.
1. The visual subjective quality of the 3 encoded files is as follows: the first file was encoded with 100 kbps and looked to be of a very bad quality. Objective quality confirms that with the value of 22 dB, which is very low. The next encoded file, with 1 Mbps bitrate, is of acceptable quality, not great. 30 dB of measured quality echoes the result we’ve seen visually. And the last encoded file, as expected, demonstrates the best quality: both the subjective and objective metrics say the same.
2. Ten times higher bitrate gives only about 35% of quality improvements. That looks insane, doesn’t it? Is it bad? Is it normal? Keep calm. We’ll review encoding in much more detail in upcoming articles.
Stay tuned!